

YOUR CART IS EMPTY
Go to cart
Faded, yellowed, and oxidized headlights walk into your shop every week, and the fix you reach for decides whether the customer comes back happy or comes back annoyed six months later. A quick wipe-on polish looks great for a day. A professional multi-step system holds its clarity for years. This article breaks down the real differences in process, longevity, and finish quality so you can pick the right approach for your business.
The gap between these two options is bigger than most detailers assume. One is a chemical shortcut. The other is a repeatable process that removes damage at the surface and reseals the lens.
A standard polish is a single-step, over-the-counter product. It is a chemical compound built for light haze removal, applied by hand or with a basic drill attachment. These products rub away a thin layer of surface film and leave a temporary shine.
The problem is what they skip. Most standard polishes have minimal or no dedicated UV protection layer. Once the factory hardcoat has degraded, a polish cannot replace it, so the lens is left exposed to sunlight and clouds back quickly. Consumer kits often lack a professional-grade UV sealant, which is why headlights can return to their foggy state within months, as UniGlass Plus notes in its review of restoration kits [1].
A professional system is a complete, multi-step kit built for technicians and detailers. Instead of a single wipe, it runs a sequence: sanding the failed coating off, polishing with a compound formulated for acrylic, then sealing the lens with a professional-grade UV coating.
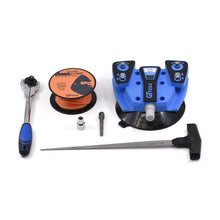
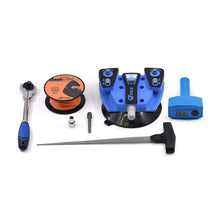
These systems are made to work with real tools. GT Tools® headlight restoration kits use a straightforward 3-step method with foam and felt pads, sanding discs, and UV curing equipment, giving consistent results whether you are using the DIY version or the professional kit. The full process replaces what oxidation destroyed rather than hiding it.
This multi-step approach is a proven, time-tested standard in professional restoration. As GP Mobile Car Wash points out in its review roundup, multi-step systems that remove oxidation and add UV protection are now judged by whether the clarity holds up, not just how it looks the day it is finished [2].
|
Feature |
Professional System |
Standard Polish |
|
Process |
Multi-step (sand, polish, seal) |
Single-step (polish only) |
|
UV Protection |
Professional-grade, long-lasting UV sealant |
Minimal or no dedicated UV sealant |
|
Longevity of Results |
3-5 years or more |
6 months to 1 year |
|
Best For |
Heavy oxidation, deep yellowing, and scratches |
Very light, surface-level haze |
|
Tools Required |
Professional polisher recommended |
Manual application or basic drill |
|
Target User |
Professional detailers and body shops |
DIY home users |
The reason a professional restoration lasts years comes down to the process. Each step does a job a polish alone cannot. Working through the full range of headlight repair equipment and supplies in sequence gives you even, repeatable results across every make and model.
Start with a thoroughly cleaned lens. Wipe away dirt, road film, and loose oxidation with a cleaning wipe or solution so the abrasive can work on the plastic and not on grime.
Then mask off the surrounding paint and trim. This protects the vehicle and keeps your results clean and professional.
This is the step that separates a real restoration from a shine. The oxidized, failed factory coating has to come off, and only mechanical abrasion removes it.
Work through progressively finer grits of sanding discs, smoothing the lens evenly with each pass. A DIY comparison from Mirage Body Shop describes the same basic sequence: wet sanding to remove the oxidized layer, polishing to restore clarity, then a UV-resistant coating [3]. Deep yellowing and scratches that a polish cannot touch get resolved here.
Sanding leaves a uniformly dull surface. Polishing turns that dull surface crystal clear. This step refines the finish down to full transparency using a compound formulated specifically for plastic.
GT Tools® DiamondClear™ Acrylic Polishing Compound uses a sub-micron material so plastics, acrylics, and polycarbonates come back to a high luster without new hazing or micro-scratching, and it pairs with GT Tools foam and felt plastic restoration pads.
This is the step that decides whether your work lasts years or months. Sanding removed the factory UV hardcoat along with the oxidation, and the bare polycarbonate underneath will re-yellow fast under sunlight if you leave it exposed.
A professional-grade clear UV coating replaces that stripped factory protection. It is the single reason a proper restoration holds up. UniGlass Plus is direct on this point: without a professional-grade UV sealant, headlights return to a foggy state within months because the process strips away the old coatings and leaves the plastic vulnerable, as covered in their pros and cons breakdown [1]. Skip the seal, and everything you did in the first three steps unravels.
A complete system is a business decision. It changes what you can charge, how many jobs you can take, and whether customers trust the result.
A professional restoration with a quality UV sealant holds its clarity for three to five years or more. A standard polish typically fades in six to twelve months. That difference shows up in your reputation. When a headlight you restored is still clear two years later, the customer tells other people. When a polish clouds back before the next oil change, they blame you.
The return on a professional headlight restoration is one of the strongest in a detailing shop. GT Tools® headlight restoration kits are built to complete a full job in about 20 minutes, which means you can turn profitable, high-quality restorations efficiently throughout the day. The reliability of consistent results is what keeps customers returning and referring others.
When customers compare restoration to the alternative of a full headlight assembly replacement, a professional restoration is an easy yes. Reliable, repeatable outcomes at a fraction of replacement cost make this service a natural addition to any shop's offerings. Service companies benchmark professional glass resurfacing against replacement costs, a parallel Glass Savers documents in its glass scratch repair guide [4]. Headlight economics run the same direction.
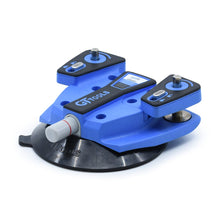
Because a professional system sands before it polishes, it can restore lenses that a standard polish would never fix: heavy oxidation, deep yellowing, pitting, and scratches. The Diamond Clear Headlight Repair Kit Professional includes a polisher, foam and felt pads, sanding discs, UV protectant, and instructional material, and it restores UV fading, scratching, and pitting across all headlight makes and models with an average repair time of about 20 minutes per car. That range lets you say yes to jobs a polish-only shop has to turn away. Explore the full line of plastic restoration products to cover trim, bumpers, and other faded surfaces on the same vehicle.
Buying the right system upfront saves you from redoing work. Here is what to look for and where to get it.
The best headlight restoration systems for professional use share a few traits. Look for these before you buy:
A full range of sanding disc grits, from a coarse cut for heavy oxidation down to fine grits that prep for polishing
A high-quality acrylic polishing compound, not a glass compound
Foam and felt polishing pads matched to the compound
A true UV-curing or UV-resistant sealant to replace the factory hardcoat
Compatibility with a durable, professional-grade polisher so results stay even across the lens
Match the system to the damage you actually see most, and prioritize kits that include everything you need to complete the job from start to finish without sourcing separate components.
The compound question trips up more shops than any other part of the job. The right formula makes the polishing step straightforward and protects your results.
Glass polishes are built around cerium oxide, which is formulated to abrade a hard silica surface. On polycarbonate and acrylic, that aggressiveness can haze the lens or dig new scratches instead of clearing the old ones. Acrylic needs a sub-micron abrasive that refines plastic to a high gloss without cutting too deep. Third-party acrylic compounds confirm the split: Glass Polish's plastic and acrylic compound is a liquid formula made specifically for plastic and acrylic surfaces and marketed for headlights, taillights, and other automotive plastics [8].
For a US-made option built for professional use, GT Tools® DiamondClear™ Acrylic Polish Compound uses sub-micron material to restore plastics, acrylics, and polycarbonates to a high luster, available in 1oz and 1lb containers. You can buy it and the rest of the range directly from GT Tools® with free shipping on all orders. Browse the full compounds and polish collection for both glass and plastic formulas, and the glass and plastic restoration collection for pads, discs, and protectants to complete the job. GT Tools® has manufactured glass and plastic polishing solutions in the USA for over 40 years, as noted on its main product hub, and sells both direct and through authorized distributors.
One note on method: for polycarbonate lenses, a wet compound method on the polishing step gives more control and less heat buildup than dry grinding, which keeps results clean and consistent on plastic surfaces. Reserve dry-grind systems for glass, and keep the finishing pass on headlights wet.
The process. A professional system uses mechanical sanding to remove the failed, oxidized coating, then polishes with an acrylic compound and finishes with a durable UV sealant. A standard polish is a single temporary step that shines the surface without removing deep damage or resealing the plastic.
A professional job with a quality UV sealant lasts three to five years or more. A standard polish typically fades within six to twelve months because it leaves the bare plastic exposed to UV light.
No. Glass compounds like cerium oxide are too aggressive for polycarbonate and can haze the lens or create new scratches. Use a compound formulated specifically for acrylics and plastics, such as a sub-micron acrylic polish.
An orbital or rotary polisher gives the most even, consistent results across flat lens surfaces. For curved or irregular lens shapes, manual control becomes especially valuable — working by hand or with a drill attachment lets you follow the contour of the lens precisely and apply targeted pressure where you need it, giving you command over the finish that a machine alone cannot always provide. GT Tools systems support both approaches, so you can choose the method that fits the job. As Hagerty's headlamp restorer testing notes, machine tools remove much of the effort but demand more control, since leaving a pad in one spot too long can melt the plastic or catch the paint [9]. Keep the pad moving and match your approach to the lens shape.
Yes. The results last years instead of months, the sanding stages let you take on heavily oxidized and scratched lenses a polish cannot fix, and the straightforward GT Tools process means you can deliver consistent, professional outcomes on every vehicle that rolls in. That combination means more jobs, higher customer satisfaction, and a reliable service built on proven results.
For shops adding this service, GT Tools® offers both DIY kits and full professional systems. Start with the DIY headlight restoration products for entry-level work, or step up to the Diamond Clear Headlight Repair Kit Professional to cover the widest range of damage on every vehicle that rolls in.